Showing posts with label sewing. Show all posts

Tuesday, April 1, 2014

Today's Lesson: Life in Colonial America

Learning about the American Revolution has been fascinating but recently, Sonshine has asked, "what was life like before the war?"  So I figured we find out!  I went to the local library and found If You Lived In Colonial Times by Ann Mcgovern. Colonial times are generally considered to be from 1492 to 1763.

The Colonists moved to America for an assortment of reasons, mostly to avoid the rule of the monarchy. Because they were establishing a new way of life, they had to set some ground rules or what they called "The Rights of Colonists," by Samuel Adams.  Kidsdiscover.com has a bunch of free lesson plans on various topics, we will be using the one on Colonial America.  What kind of job would you have in Colonial America?  Here is an activity that matches the jobs and their functions. The National Park Service offers a printable activity book with lesson plans and activities.  123Homeschool4me.com  has some really fun (and funny) activities and has a free download link to 45 pages of activities (click on the picture) that are great for younger kids.  For big kids try notebooking, notebookingpages.com, has a free resource center, all you have to do is create a login for free notebooking pages and templates.   PBS has a great show called "Colonial House" and an interactive website with lots of activities, you may be able to get the video at your local library for free. (Please note that there is profanity which is beeped out, a brief moment of nudity (side boob and a little booty), animals give birth and a guy comes out as gay to the church.  Most of this happens in episode 3, so if you don't think your kids can handle it, you might want to skip this series. In all honesty these people would have never made it in the colonies and would have all been burned at the stake. However, this does give some insight on what things would have been like.
Find out what Colonial life was like for kids on this video.Making food is always a great way to learn about different time periods.  Colonial Williamsburg has a long list of interesting recipes to try.  My Mommy Makes It blog has a quick how to on making pinner caps and pockets for girls!  KidsActivities.net has tons of ideas for crafts, recipes and lesson plans.


-Have Fun Learning!

UPDATE:  This unit is taking longer than I have expected, because the kids are really enjoying learning about this time period.  They seem to be fascinated with every aspect of colonial life!  I will continue to update this post to reflect what we have been doing. We have also been reading a book I found
My America: Our Strange New Land: Elizabeth's Jamestown Colony Diary, Book One, it is a fictitious diary of a young girl and her life in the new Jamestown settlement.


Worksheets:
Everyday Things
Early American Coloring sheets

Crafts:
Weave paper baskets
Peasant dress with apron- Adorable, great for dress up or for everyday wear. Would also work for Little House on the Prairie fans. Or sew in modern fabric prints for a quick project.
Make a rag doll


Monday, November 4, 2013

Halloween Part Deux: Cinderella Costume

After having to wear a box of puppies for the entire weekend, Teenie was ready to be a princess and demanded that I finish her dress. Sorry for the lack of tutorials, but as stated in my prior post I have been suffering from a serious case of lazy-assedness and I was in a super hurry to get this project done and over with.  Basically what I did was take a dress and cut out the middle of it, then stitched it up to fit Teenie. This was not an easy task, as the fabric that this dress was made out of was a pain in the ass to sew because it slid around like crazy on the machine.      

The second hand dress came with a matching sheer wrap so I cut it in half to use it to make the two poofs on the the sides, and a matching headband.

With the scraps I made straps, (me and Teenie agreed that the original dress's pouf sleeves were just way to lame and outdated) an insert for the back that laced up (to make it more modest)

Because it gets super cold on Halloween night I made a matching hooded cloak so she wouldn't have to cover up her dress with a big coat.

I used 2 yards of polar fleece, 3 yards of fun fur trim, and a yard of Disney Princess ribbon for the tie closure.  

The gloves are the same ones that she used for her Belle costume, the choker was a black ribbon that I sewed Velcro closures to. 
Her"glass" slippers were the silver one inch heels that she insisted that I buy her for Easter.
All in all I'd say her costume came out well, she loves it and I'm just happy that it's done.  And I did it all without getting blood, tears or wine stains on it.  Yay me!

Wednesday, May 22, 2013

Tutorial: Quick and Easy Gardening Apron

There's nothing more that I enjoy, than making stuff for my loved ones.  So when Mother's Day came around, I thought I would make a gifts for my mom and my mom in law.  I made gardening aprons and gave them gardening themed gifts.   Here's the step by step tutorial of the apron I made for my mom.
Gather your materials, I used a 26" long by 18" wide piece of cotton broadcloth. You can also use canvas or denim. Just make sure your material is sturdy =).  Bias tape or binding, I used 1/2" double fold because it is easy to work with. You will also need co ordinating ribbon 1" wide or less. I chose a sturdy 7/8" grosgrain ribbon.
Iron your fabric.
 
Lay your fabric lengthwise and measure 12" from top edge. Mark with chalk. Do this on both sides.

When your lines are drawn use a yardstick to draw a line all the way across.  Cut on the line. The shorter piece will be your pockets and the larger piece is your to be your apron.

Measure 1/4" from the top, fold and press down, all the way across.
Stitch in place.  I used a fancy stitch because it will help to keep the fabric from unraveling. But you can use a straight stitch if desired.


Here's a close up of the stitches.
Line up the bottoms of you two pieces of fabric with the stitched part facing the top of the fabric.

Using the bias tape tuck the edges of your fabric between the folds. Do both sides first, then do the bottom, tucking in the ends of the bias tape when you get to the two bottom corners.  You can leave the top pieces alone for now.
At this time you can cut the ribbon, you need two pieces about 20" long each, cut ends diagonally and treat with Fray Check.
While that is drying we are going to go back to the apron.  The next thing you are going to do is figure out where you are going to put your pockets.  This is up to you, I used seed packets and couple of gardening tools to help me determine where to mark where to put the pockets. Then I used rulers to make sure the line would be straight and marked with chalk.


Stitch around the bias tape as neatly as possible.

Then stitch along the chalk lines using a thick stitch or use a straight stitch and go over it about 3 times.

Flip fabric over, measure about 1 1/2 inches on both sides, then draw a line across.
Fold and press down.

Tuck 2" of ribbon inside fold. Then fold around the bottom of your ribbon.
Using a ruler make sure your fold is 1" all the way across.
Pin in place. All the way across.
Stitch ribbon in place on both sides. Then following the fold with the needle as close to the edge as you can get without going over. Clip all loose threads.


Ta Da! You're done!  Now go garden....
...Or roll up, tie with a ribbon and give it to your favorite gardener!

Tuesday, April 30, 2013

Tutorial: 99 Cent Store T-shirt + 1/2 yard of fabric = Dress

The other day, on one of my very frequent trips to the 99 cents store, I spied a bin full of clothing there.  Not being one to turn down a deal, I thought I'd stop and take a look and found a bunch of t-shirts.  One them was the one I used for this craft, a black fitted tee, size small.  I went home and rummaged through my fabric stash to see what kind of craftiness I could apply to this poor, boring shirt. 
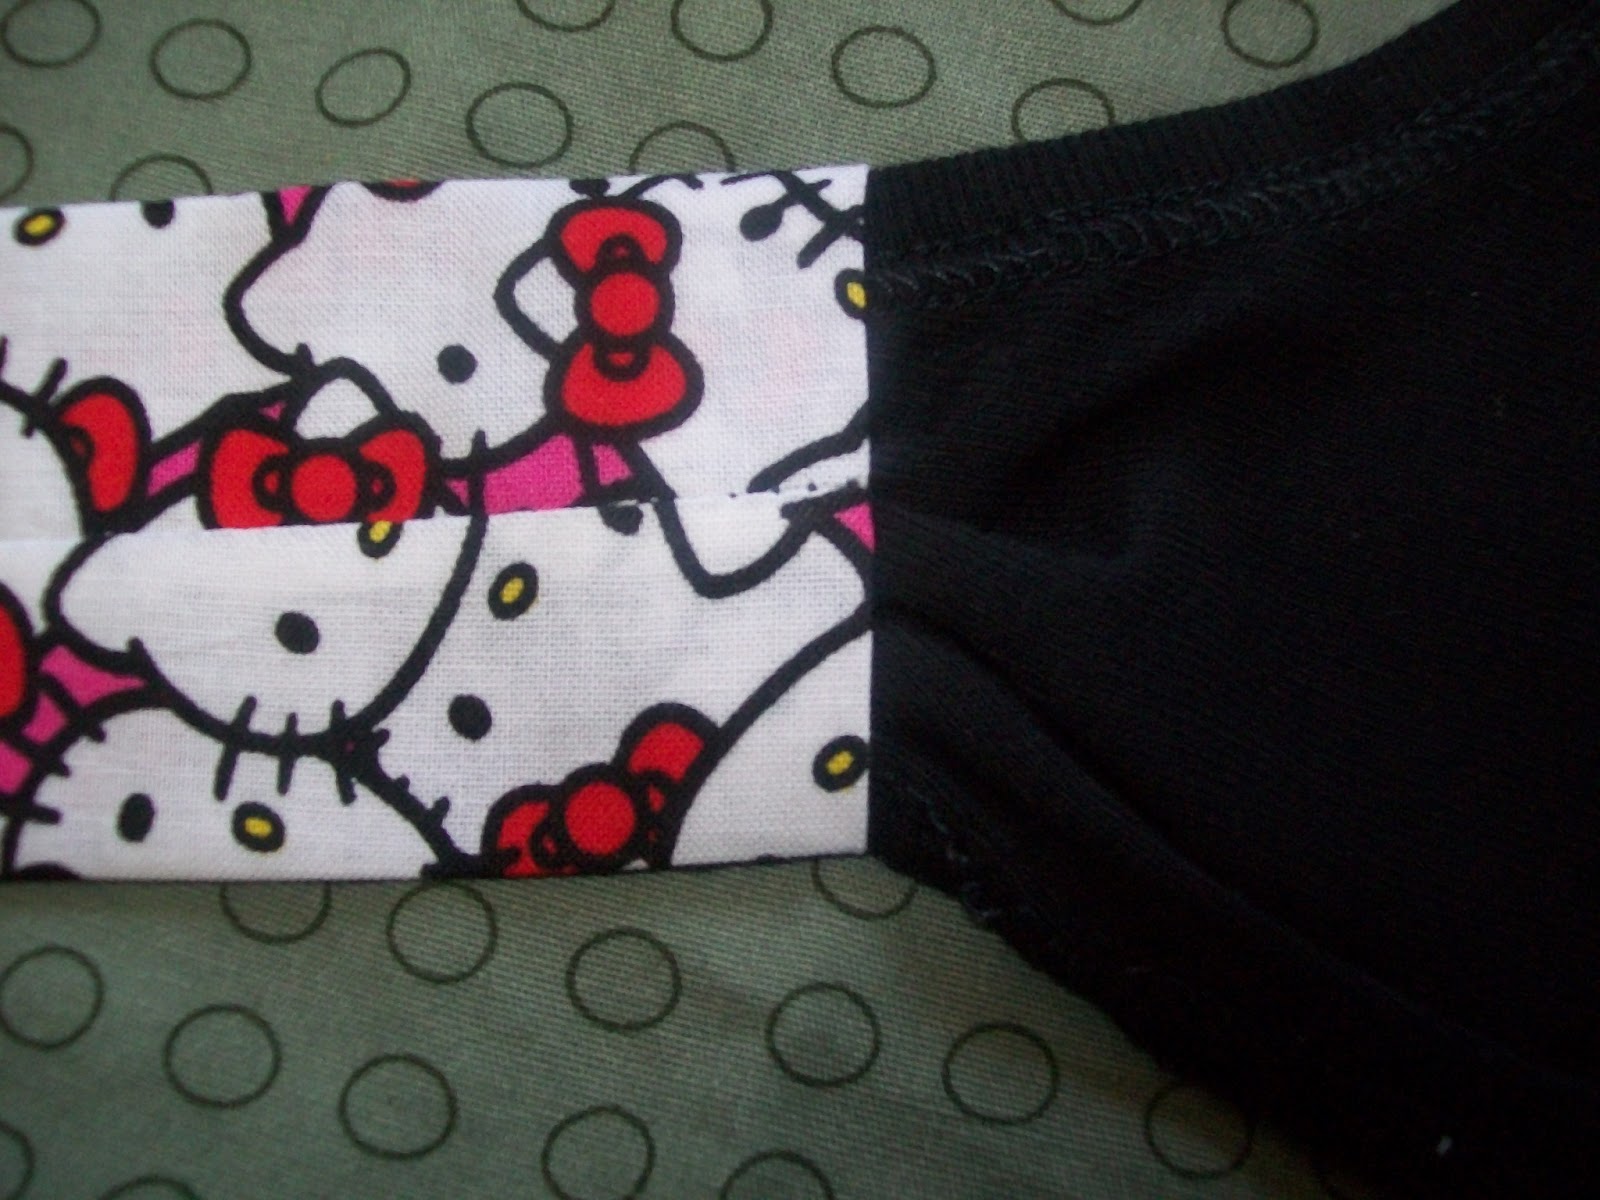
I found half a yard of Hello Kitty fabric, that would be perfect.
That being settled, the first thing I did was turn the shirt inside out and cut the sleeves off following the seams.

Then I cut off the top back part of the shirt, starting at the shoulder seams, then across the back. Then I turned it down about 1/2 inch and pressed it in place. You can adjust this to make it lower or higher, I didn't want the back too low since I was making it for Teenie.
I set the shirt aside and started on the fabric.  Using the shirt hem as a guideline I stretched it as far as I could and lined the fabric up with it.  Then I cut off the excess fabric. Set aside extra fabric, for use later. If you have no extra fabric, skip this step.   I cut the entire 1/2 yard in half long ways and pinned up 1/4 inch for a hem, pinned and pressed in place.
Stitch in place using a finishing stitch.  If you ave a fancy, computerized sewing machine, just pick one of those wide stitches.  If you have a regular sewing machine, just use a zigzag stitch.
You want the edge to look like this. 
 Then match together sides and sew together so you are left with a big loop.

On the opposite end of the hem, use straight stitch and make the stitches as long as your machine will allow.  Then pull the bottom thread so that the fabric starts to gather.
Pin shirt hem to gathered edge of fabric. You want to make sure you are pinning them both right side out. This is important because you are actually going to use the shirt hem to sew as a guide line. If you need to, pin shirt and skirt together inside out first, then flip right side out and re pin. Make sure you take all of the pins out of the underside.  Then sew, using the hem as a guide line. I actually stitched right on top of the bottom hem of the shirt using black thread. Stitch slowly on the line careful to avoid pins.
Ta Da! It almost looks like something.  But it isn't anything yet, because it desperately needs straps to be functional.
 On the edges of the shirt that used to be armholes, I used a finishing stitch to run along the edge of the shirt. I just chose a stitch that looked as close to the manufacturer's stitch as possible.  Or you could just use a zigzag stitch and run along the edge of the armhole, sewing over the folded hem, and a little past it.  Do this on both sides.
Turn and stitch across back folded down hem. I feel that it is better to use the same color or as close to possible as the fabric you are sewing, because it hides mistakes, which is very helpful if you have been drinking and sewing.  After the back hem is stitched feel free to cut excess material if desired.  At this point you are pretty much done, all you need is straps.

This is the excess fabric I had left over from the skirt, I actually ended up with 2 pieces this size.  If you do not have any feel free to use what ever excess shirt material you may have, or scrap that idea and use ribbon or contrasting fabric.
Cut in half lengthwise.  Then fold each strap together lengthwise again, so they are inside out.
Stitch along the edge leaving ends open. 
Turn right side out, center the seams and press.
 Tuck in ends.
 Tuck top part of sleeves in as neatly as possible.  Make sure the seam will be facing on the inside of the top. Pin in place, then sew.

 Here's what the straps look like.  At this point you will want to try your dress on your model to figure out where the straps will sit and to figure out if any other alterations need to be made.
 I had Teenie put on the dress and then pinned the straps in place with safety pins (because little kids really, really hate it when you poke them with straight pins.)
Sew in place, as you can see my stitches got a little wonky. This is what happened when you drink and sew.  But it's on the inside and no one can see it unless they look for it.  Any hoo, I decided the dress looked a little plain and needed some pizazz. Since I'm running low on rhinestones and glitter, (Teenie thinks everything looks better with bling and glitter, and I totally agree) so I made a bow.
 Using the last of my Hello Kitty fabric, I cut two rectangles, turned them inside out and sewed them together on all four sides.
 Pull apart in the center making a little pillow.
 Snip a little hole in the center of one side, then turn the fabric right side out.
 Pinch together using a little accordion fold.
 Use fabric to hold center of bow. I wanted contrast so I used a piece of the t-shirt.
 Pin and hand stitch straight through the bow and the center piece of fabric.

Either attach with a safety pin, sewing the safety pin into the fabric. Or hand stitch the bow on your dress. I decided to hand sew it.

Yay! All Done!
Time for a photo shoot!